
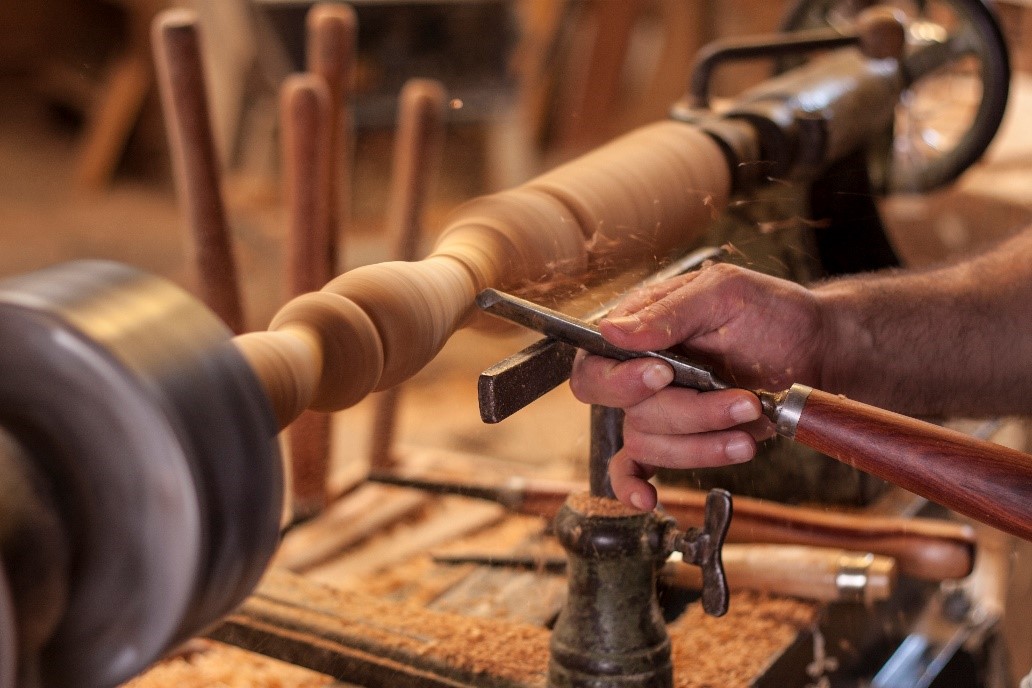
A lathe tail stock has several functions that you need to understand. Jacobs chuck taper, New Haven carriage are two types of tailstocks. These stocks are essential to your work quality and help keep the chuck in its place when turning. This article will explain the various types of tailstocks as well as their functions. It is essential to learn about the different types of tailstocks before you decide to buy one. Find out more by reading the following!
Lathe tail stock function
A lathetailstock is a piece used in machine tools to attach to the center part of a turntable. This allows you rotate and hold work pieces. A tail stock can also be found in milling machines. This is used to support a workpiece while it is being rotated. Tailstocks can be adjusted in length to accommodate different lengths of work. The chuck and tailstock are usually attached together.
It is important to know how to use the tailstock in order to be able to properly use a lathe. When using a lathe, there are safety rules. For example, you must use the correct tools. You also need to keep the machine clean of lubrication liquid. It serves many useful functions such as clamping and securing workpieces to the tailstock. It is also useful in setting up a cutter tool.
Types of lathe tailstocks
There are two main types of lathe tailstocks: stationary and sliding. A sliding tailstock allows for easy tool changes and keeps the spindle and workpiece aligned. A stationary tailstock is more convenient for larger machines and rotates around a center point above the head of the lathe. Each type has its own advantages and disadvantages. These differences are described below. Let's take a look at some of the most common types of lathe tailstocks.
Tailstocks are used for parts with a higher length-to-diameter ratio than the diameter. This is because a higher L to D ratio increases the risk of deflection. A tailstock that has a greater L to D ratio will be required for a workpiece with a diameter of 1 inch and a length up to 6 inches. If a part's L to D ratio is greater than 3:1, a tailstock is recommended.
Jacobs chuck taper
Jacobs chucks have a JT6 arbor. The other end has the morse taper 3. It mates as friction fit. A Jacobs chuck can replace a chuck Arbor. A chuck arbor can be purchased with a JT3 taper and mounted to the tailstock on your lathe.
Most lathes can use a 5/32" metric Jacobschuck. It can fit drills from 4 mm to 8 mm. The chuck arbor, a Morse taper of short length that doesn't need to be cut, is designed to fit tail stock. It fits the Jet 1014 miniature wood lathe. It includes a chuck key as well as a drawbolt equipped with washer.
It is essential to ensure that the Jacobs Chuck arbor is accurate in order to prevent a drill bit binding. To remove any dust or shavings, you should periodically pull the quill out. This will help prevent your bit from overheating and causing the shop to fill with smoke. Clean holes will prevent your Jacobschuck from coming out your tail stock.
New Haven carriage
A typical early American carriage featured a square tailstock or a rectangular spindle. Similar models were manufactured by Ames Mfg Co. or Alexander Thayer & Hannibal Houghton. Alexander Thayer & Hannibal Houghton were some of the most iconic examples of tailstocks during this period. These models were shown at the Worcester, Massachusetts 1853 Mechanics Exhibition. The design featured a tall toolpost that slid into two large T-slots.
The tailstock supports the end work opposite to the main-stock. It serves as a moving centre for various tools. A clamped end-stock carries the boring bars' ends. To be effective, a tailstock should be strong-duty and include a traveling spindle. In addition to providing support, it should also be capable of setting over at right angles to the center line.
FAQ
What is the difference in a hobbyist and professional woodworker?
Hobbyists enjoy creating things out of wood. Professionals tend to focus on the quality. Hobbyists are proud of their creations and will often share them with family members and friends. Professionals will spend hours looking at designs before they start to build a project. They'll pay great attention to details, from choosing the most suitable materials to finishing the work perfectly.
How do I organize my shop?
The first step toward keeping your workshop clean and organized is to set aside a designated area for storing tools. Your tools will stay sharp and ready to go when they are free from dust and debris. Hang tools and accessories using pegboard hooks.
How do you calculate woodworking costs?
It is crucial to keep project costs as low-cost as possible. You should always try to make sure that you are getting the best deal on materials. It is important to take into consideration all factors that can impact the cost of your projects. These include time, skill and experience. To get an idea about the average cost for common household DIY tasks, see our guide to the average woodwork project price.
How do I identify the type of wood that I am dealing with?
Always verify the label on wood purchases. The label should contain information about the wood species, its moisture content, and whether it has been treated with preservatives.
Statistics
- Most woodworkers agree that lumber moisture needs to be under 10% for building furniture. (woodandshop.com)
- The U.S. Bureau of Labor Statistics (BLS) estimates that the number of jobs for woodworkers will decline by 4% between 2019 and 2029. (indeed.com)
- In 2014, there were just over 237,000 jobs for all woodworkers, with other wood product manufacturing employing 23 percent; wood kitchen cabinets and countertop manufacturing employing 21 percent. (theartcareerproject.com)
- The best-paid 10 percent make $76,000, while the lowest-paid 10 percent make $34,000. (zippia.com)
External Links
How To
How to make wood joints
This tutorial will teach you how to join two pieces wood together. The "pocket hole joint" is a method whereby we drill holes into the wood and glue them together. This method is great if your wood's straight and smooth. You might consider dowel joinery if your wood isn’t straight or flat. Here are the steps
-
Drill Pocket Hole Joints. First, measure the area where you wish to place the pocket joint. Then drill 3/4 inch deep holes into the ends of each piece of wood using a jig saw or handheld drilling machine.
-
Sand Smooth. The wood's edges can be sanded to prevent splitting.
-
Glue Together Apply glue to both ends of the wood. Let it sit for about 5 minutes before clamping the pieces together.
-
Attach the Pieces together. After the glue has dried you can attach the pieces to form a flush joint.
-
Trim Joinery. Trimming the joinery after glue has completely dried.
Be sure to leave enough space between each piece so that they can be turned inside-out.