
A bowl gouge is a tool used for carving or smoothing out the surface of a bowl. You can do different types of work depending on its size and shape. An instruction booklet is included with each gouge. It features a forge tip to allow rough cuts on the inside or outside of a container. It also features a balance edge and edge to aid in fine projects. It is made of high-quality steel.
Shape
A bowl gouge is a sharp tool that is used to shape bowls. It is made of wood and can be very expensive. A gouge can be purchased at a home center for just a few dollars. This wood is easy to work with and can be used for several exterior cuts and hollowing. You might want to start bowl making by using a 2x6 basic piece. This is an affordable option that is easy to use and is great for beginners.
There are many styles of bowl gouges available. A basic bowl gouge is 5/8" in diameter, while a 3/4" gouge is a little larger. Although larger tools are more efficient, this does not mean they are better. You can experiment with different sizes and gouges until the one that best suits your needs is found. Every turner has a preferred grind. You should experiment with various tools until you find the one that works best for them.
Size
There are two systems that size bowl gouges. English and North American systems use different methods to measure gouges. One system labels the same gouge 1/2" while the other uses 5/8", or 1" diameter. This difference in measurement makes the gouges more precise and helps you select the right size for your lathe. Before you choose the appropriate bowl gouge, measure the bowl. Next, you will need to determine the size of the bowl and the flute of your gouge.
Although there are many benefits to using larger bowl gouges, they tend be heavier and bulkier. For this reason, beginners should buy a smaller one and increase their size gradually. You should limit your choices to a single size for experienced woodworkers. After you've mastered the art of woodworking, you can buy larger bowl gouges if necessary. The bowl gouges made of carbon steel are more durable than stainless ones, but they require more maintenance.
Function
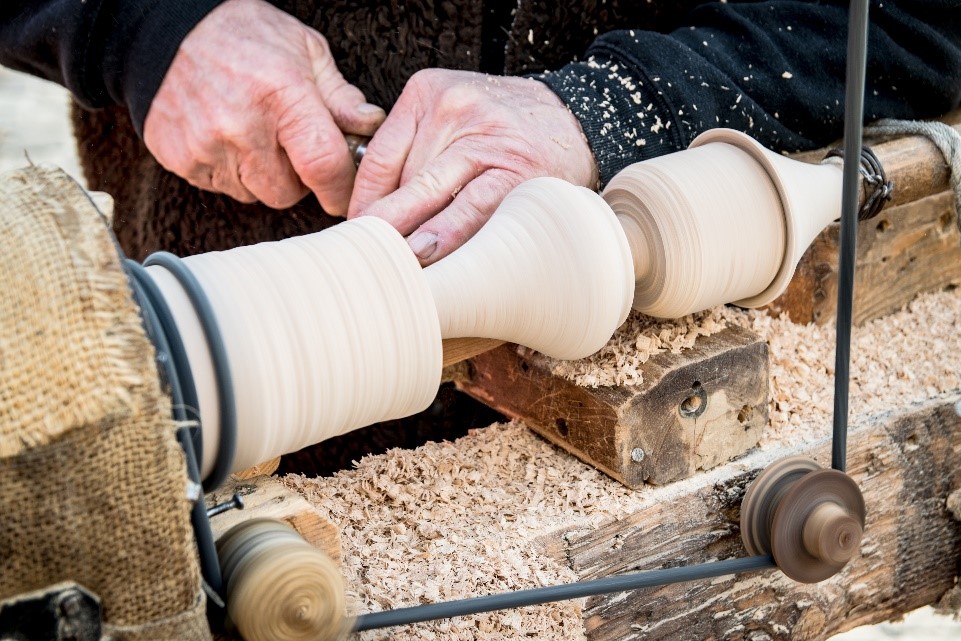
A bowl gouge performs two functions. The bowl gouge prepares the outside of the bowl for sanding. The tool rest pivots the left wing of this gouge. The cutting edge of the gouge contacts the wood as soon as the handle is raised. The cut then moves away from the wood, revealing a smooth, ready-to-sand surface. A bowl gouge is secondarily equipped with a single cutting edge, the bevel.
A bowl gouge's bevel angle can vary from 40 to 45 degrees. This can vary depending on what circumstances are at play. Large bevel angles work best when turning large bowls. Smaller angles are better for cutting beads or spinning spindles. Choosing the right angle depends on what you are going to use the tool for, as a large bevel angle can be difficult to achieve without damaging the wood.
Handle
To control the shape of the bowl, it is important to keep the bowl-gouge handle in contact with your body when cutting bowls. While sweeping the handle to make a convex bend in the bowl's surface, hold the tool rest securely with the left. You can adjust the height at which the tool-rest is situated so that you can achieve the desired depth and width. A sharp gouge can cut through the bowl up to an inch at a stretch, depending on the size and shape of the bowl.

A bowl gouge is shaped like a bowl, and its shaft is usually made from a steel rod that is milled into a suitable shape. The bowl gouge usually has a concave or flute area that is hollowed during the milling process. Handles made of hardwood are common for bowl gouges, but there are many other materials. Some bowl gouges are equipped with large handles that make it easy to work on large areas.
FAQ
Can I succeed in woodworking if I'm a genius?
No. Woodworking is not rocket science. You can create beautiful pieces of art by learning how to use simple power tools.
What kind wood should I use for my project?
Woodworking is a popular job that involves oak, pine and maple. Each type of wood has unique characteristics that affect the look and feel of the final product. For example, oak tends to be darker and harder than other woods. Birch, which is lighter and soft, is more heavy than mahogany. You can also choose between solid wood and veneers. Veneers are thin sheets of wood that are glued together to form a single layer.
How can a woodworker start making money?
Many people are beginning to learn how build furniture to launch an online business. If you are just starting to build furniture, there are many other ways to make money than selling on Etsy. You could also sell at craft fairs, or other local events. You could also offer workshops to help others learn how to make their own furniture. You might be able to offer services like remodeling homes or making custom pieces for clients if you are a skilled carpenter.
How often should I get new supplies?
You will likely need to replace some tools over time. Sharpening hand tools is a must. Power tools will require replacement parts every so often. To avoid buying too much at once, try to spread your purchases out over a few months.
How much should a skilled woodworker earn per hour?
The hourly rate for a professional woodworker varies depending on many factors, including skill level, experience, availability, location, and other variables.
A skilled woodworker can expect an hourly rate of $20-50.
A less experienced woodworker may charge as little as $10 an hour.
Statistics
- The best-paid 10 percent make $76,000, while the lowest-paid 10 percent make $34,000. (zippia.com)
- Woodworkers on the lower end of that spectrum, the bottom 10% to be exact, make roughly $24,000 a year, while the top 10% makes $108,000. (zippia.com)
- Average lumber prices rose about 600 percent between April 2020 and May 2021. (familyhandyman.com)
- Overall employment of woodworkers is projected to grow 8 percent from 2020 to 2030, about as fast as the average for all occupations. (bls.gov)
External Links
How To
How to stain wood
The process of staining wood involves the application of chemicals to the wood's surface, which causes it to change its color. This chemical reaction causes the wood color to change from white and brownish red. Although oak is the most popular type of wood to stain, there are many other types that can be used.
There are many ways to stain wood surfaces. You can mix the stain with a solvent, such as turpentine, and spray it onto the wood. You can also apply a solution containing water and dye directly to the wooden surface. You can mix stains into varnishes or paints to make them part of your finish coat.
The first step in staining wood is preparing the surface. To apply the stain, clean the wood completely. Sanding the wood smooths out rough spots and scratches. The next step is to determine the type of stain you would like to use. There are two main kinds of stains available: non-penetrating stains and penetrating. Penetrating stains penetrate deeper than non-penetrating stains, which makes them great for dark colors like mahogany. The best non-penetrating colors are those that work with light colors like maple.
After choosing the type and application method you prefer, gather your tools. You can use a paintbrush to apply stains. This allows you spread the liquid evenly over the surface. It is a good idea to have rags on hand in case you need them to clean up any stains that may remain after you have finished painting. You should have enough containers to store the various components of the stain mixture if you intend to mix it yourself.
Once you have prepared all your materials, it is time to clean the areas where you will stain the wood. Clean the area with soap and warm water to get rid of dirt and grime. Use a dampened sponge and warm water to clean the entire piece. Take care to remove all debris and dirt, especially if you are planning on staining darker wood.
Next, apply the stain. Apply the stain by brushing or spraying it onto one side of the furniture. You should work slowly and carefully. Continue moving along the grain until you reach your opposite end. Keep the stain from dripping off the wood's surface. Before you proceed with the next steps, let the stain dry completely.
Apply a clear polyurethane sealant to protect the painted surface. Apply three coats of polyurethane sealer. Allow the third coat to dry overnight before sanding the final coat.